9.28.2011

3 Ingredient (or 4) Tomato Sauce

I'm happy to say that I am back to my love of cooking, after the 1st trimester of not wanting to cook AT ALL!  But, since I'm tired and busy with a toddler in this pregnancy I need quicker, simpler recipes.  This one fits the bill.

3 Ingredients (or 4 if you like garlic) + Pasta of your Choice=One DELICIOUS dish
Photo from steamykitchen.com

We like it saucy here at our house.  I think this amount is good for about 1/2 lb pasta.  For 1/2 lb pasta and this recipe it cost less than $2.50 (which is far less than most big jars of  pasta sauce!!)

Ingredients:
28oz can of whole peeled tomatoes
4 TBSP unsalted butter
1 onion (peeled and halved)
3 cloves garlic (optional, I added this!)


Place the butter, onion, minced garlic and tomatoes+the juice into a sauce pan and simmer uncovered for 45 minutes.  Remove the onion. Then, use the back of a wooden spoon to crush up the tomatoes after cooking.  EASY I SAY!!!!  Serve over your choice of pasta and ENJOY!!

Recipe slightly adapted from Essentials of Classic Italian Cooking by Marcella Hazan

Airplanes, Airplanes

After dinner last night we met up with our friends Holden & Liz for a little airplane watching at the airport.  The boys had a blast and it was great seeing these two friends reunited.  It had been a while since they'd seen each other.  I love that Jackson is at the age where he has some real friendships blooming!

Here are some fun pics from the evening viewing:


9.27.2011

Help! Need your Suggestions!

Going to spray paint our rattan chair on our back patio, SOON hopefully.  The Texas sun has really gotten to the stain.  Our umbrella for our table is bright yellow. The patio is a flagstone pattern in a beige stone color and bright border.

So I need your opinion folks:  What color should we do? 
We also have a matching side table that has a glass top that we will also be painting. Should we do the side table in the same color? different?

Margarita 
Vermillion

Porch Yellow

Cool Aqua
Utah Sky

9.26.2011

Yummmm Biscuits!

I was in need of some comfort food after a wild adventure to Labor & Delivery yesterday at lunch time.  All is well...after a couple shots and lab work they got my contractions to stop and we were out by dinner time.  But not really a FUN adventure...but an adventure.

So, today we just did Jackson's swim lessons (man he is a FISH!) and I made a quick EASY batch of Flaky Biscuits right when Jackson went down to nap... then back to laying down.  This recipe couldn't be any easier or quicker in my opinion for yummy, flaky biscuits. Try it!


Fat, Flaky Buttermilk Biscuits

4 cups all-purpose flour  (I subbed 2 cups of this for whole wheat flour...might just add 1 cup next time..a little "dry", but nothing some jelly doesn't cure!)
4 teaspoons baking powder
1 teaspoon baking soda
1 teaspoon salt
12 tablespoons cold unsalted butter, cut into cubes
1 1/2 cups cold buttermilk
1/2 cup heavy cream
4 tablespoons butter, melted, for brushing over biscuits 

Preheat oven to 450°F.

Combine flour, baking powder, baking soda, and salt in a large bowl. Scatter the cubes of cold butter over the top of the flour mixture; cut in and mix using a pastry cutter or fork until the mixture resembles coarse meal. 

Add the buttermilk and continue to mix using fork or pastry cutter until mixture just begins to come together.

Scrape the dough onto a lightly floured counter and pat the dough into a 10 by 12-inch rectangle about 3/4-inch thick. Use a 3-inch round biscuit cutter to cut out biscuits and place them on a lightly greased baking sheet about 2 inches apart. 

Brush the tops of the biscuits with heavy cream. Bake for 12 to 15 minutes or until lightly golden brown. Remove from the oven and brush tops with melted butter. Serve warm and enjoy!

See the original blog post here by Baker Girl.  She has YUMMY pics (much better than my camera phone shot above). I didn't feel like digging out the camera today.  

9.23.2011

1st Day of Fall- Jackson Style


How Mommy gets ready in the morning

Sometimes as Mommies we have to find a way to keep our kiddo(s) out of trouble so we can get ready. Which for me getting ready these days just includes: deodorant (obviously I showered but probably the night before), moisturizer, brush teeth/hair, pull hair in ponytail or put on a hat, and get dressed.


Jackson likes to pretend to "work" like Daddy.  My new quick trick: Sesame Street Online.  I go to toddler videos and it plays a few 2-3 minute clips back to back and BINGO Mommy is able to go out in public without TOO much embarrassment.  At least he is learning his ABC's and 123's right?!?!


love this BIG BOY!

Fabric Tree DIY Tutorial

I was walking through Hobby Lobby and saw this styrofoam cone form and had an "ah ha" moment.  I got a pretty large one, but there are much smaller ones too that I may go back for later :)

I've seen pom pom, coffee beans, candy decorated ones etc for Christmas and decided I'd try doing something with layered fabric instead.  I love how it turned out for his "Modern Nature" baby room.

Materials:
Styrofoam Cone
Fabric (I think I used about 1/2 yard since I got such a tall tree)
Glue Sticks/Gun
Rotary Cutter/Mat OR Pinking Shears

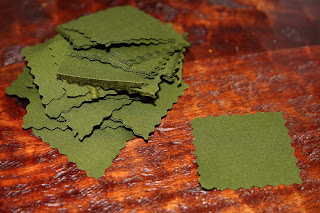
First step was to cut fabric squares with my Rotary Cutter and Mat.  I made my squares 2"x2".  If you don't have a rotary cutter and mat you can just use pinking shears.

Next fold the 2"x2" square in half
Then in half again (excuse the lack of manicure on his mama)
Then I put a dot of hot glue (be careful!) in the corner of the last fold so that it'll stay folded for you.

Then you just place each "triangle" on the cone with glue.  I worked my way down the cone and I turned the triangles different angles to they would all lay just a little differently.

up close picture of the pinking edges

This project is something very easy to do while watching TV however it takes a little while just because its a little tedious.  I think I used 250+squares on this large tree.  I will be trying a smaller tree soon to go with this large one.  I'm going to do the next one with some patterned fabric instead :)   

Here it is now in its new home in Lincoln's baby room:


And for a sneak peek, yet again, here are some fabrics that are soon to make their way into his room:


9.20.2011

Sneak Peek at Lincoln's Room

Here are just a few pics of Lincoln's Room in progress:
Lincoln's door to his room that I put letter decals on! Jackson also has this on his door to his new room as well.

Here is a find from my DC days.  It is an old white washed window turned mirror :)  Love how it looks in his room and loved reusing this in a completely new way in Lincoln's baby room.
This project was a wooden "L" I picked up at Hobby Lobby that I covered with green moss!  I loved how it turned out.

Here are a couple strands of mini burlap flags/bunting that I got at this awesome Etsy shop.  One of my favorite songs when thinking about my current and future baby is "Baby Mine" from Dumbo that you can listen to here.  I thought it was really fitting so I had her custom make this.  

Here is just one of the 3 rustic stars I'll have in the room as well as this drift wood vase I picked up.


I have a few more fun things to share with you as I get some more things put together but I thought this was a good sneak peek!

9.19.2011

22 weeks

22 weeks with Lincoln
Pregnancy Highlights:

How Far Along: 22 Weeks

Size of baby: Spaghetti squash (11" long) and weighs just under 1 lb.

Total Weight Gain: 11 lbs (at this point with Jackson I had already gained 22!!)

Maternity Clothes: no choice now...look at the belly!

Gender: It's a boy! Lincoln MacGregor

Movement: Lincoln is quite the mover and shaker.  Rob is enjoying feeling his son move around too.

Sleep:  Good. Very tired at the end of the day.  I fall asleep REAL quick!

What I miss: Raw Sushi, My regular clothes

Cravings: Salty foods, fudge pops

Best Moment of the Week:  Getting out some of Lincoln's clothes to see what "winter" clothes I may need and seeing all those TEENY clothes again. Made it a little more real!

9.17.2011

Slow Cooker Lasagna

I made this for dinner last night and it was fantastic!!  Its a little too cheesy for us so I will be cutting the cheese by a lot next time, however for most you will LOVE the amount of cheesiness.  It was so moist, no dry/crusty edges and it made the house smell delish!  It was super simple, quick and no complaints from the dinner table!


It makes A LOT like all other lasagna recipes so our neighbors got a free dinner at their door when they came home from work.  AND we still have some left over for lunch today. Another bonus, Jackson LOVED it too. Ate it up!


Slow Cooker Lasagna from Deceptively Delicious by Jessica Seinfeld

Ingredients
  • 3 cans (14.4 ounces) crushed tomatoes
  • 3 cloves garlic , finely chopped
  • 2 Tbsp. dried oregano
  • 1/2 tsp. kosher salt
  • 1/4 tsp. red pepper flakes
  • 1/4 tsp. freshly ground black pepper
  • 2 containers (15 ounces each) fresh ricotta
  • 2 cups (8 ounces) grated mozzarella
  • 1/4 cup grated Parmesan
  • 12 lasagna noodles (about three-quarters of a 1-pound box)
  • 5 ounces (about 6 cups) baby spinach
Directions
In a medium bowl, combine the tomatoes, garlic, oregano, salt, red pepper and black pepper. In a separate bowl, mix the ricotta, 1 cup of the mozzarella and Parmesan.

In the bottom of a 5- to 6-quart slow cooker, spread a thin layer of the sauce. Top with 3 of the noodles (breaking to fit as necessary). Spread about 1 cup of the sauce over the noodles and layer with 2 cups of the spinach and 1 1/2 cups of the cheese mixture. Repeat twice more with the noodles, sauce, spinach and cheese mixture. Top with the remaining 3 noodles, sauce and 1 cup mozzarella.

Cook on low, covered, until the noodles are tender—especially in the center of the lasagna—about 3 to 3 1/2 hours.


9.08.2011

New Fall Wreath!

Finally got to a project I've been wanting to get to for a while...my new Fall Wreath.


I bought a styrofoam 18" wreath form ($6 after coupon), wrapped it in 12 yards of golden rod ribbon ($4), added Cork Flower shapes ($.63) on clearance and fall flowers ($2), a little moss (~$2) and letter D I painted red & copper ($2).  I just hung it with some scrap ribbon I had.  I love how it turned out! What do you think?


Total project cost: $16.63! A lot cheaper than the $75 ones I love but refuse to buy.

Want to see some other AWESOME wreath ideas....go here! Too bad I can't make one for EVERY day of the year!